CLICK HERE FOR FREE BLOGGER TEMPLATES, LINK BUTTONS AND MORE! »

7.16.2009

Coffee Cake


2 Cups Bisquick
2/3 Cup Milk
2 Tbsp Sugar
1 Egg
Mix together and pour into a sprayed bundt pan.
Topping
2/3 Cup Bisquick
1/3 Cup Sugar
1 tsp Cinnamon
1 Tbsp soft butter
Mix and sprinkle on batter
Bake at 350 for 18-22 minutes.

Beef Manicotti


1 lb Ground beef or turkey
1 slice bread, crumbled
1 egg, beaten
Little bit of milk
16 oz mozzarella cheese
Manicotti Noodles, cooked
1 Jar (28 oz) spaghetti sauce
Brown meat, drain and set aside. Beat egg with milk. When meat is cool, add bread crumbs, egg and milk, half of cheese. Spread small amount of spaghetti sauce on bottom of a 9x13 pan. Carefully fill noodles with meat mixture, lay them in pan. Cover with spaghetti sauce. Cover with foil. Bake at 350 for about 45 minutes, until heated through. Remove from oven and sprinkle with remaining cheese. Return to oven till cheese is melted.

7.14.2009

Rachie's homemade mozzarella sticks


Leisa requested this recipe from me, so I had to share! These are fairly quick and very easy to make and more delicious than you can imagine!

What you'll need:
A block of mozarella cheese
Italian style bread crumbs
4-6 eggs
Vegetable oil
Dipping sauce of your choice (ranch, marinara, etc)

The reason there aren't any specific measurements is because I made these on a whim after watching an old boyfriend make them a loooooong time ago. You don't really need any specifics anyway!

What you do is cut the block of mozarella into about 3-4" long, 1/2-1" wide sticks... eyeball it. Beat the eggs in a bowl and roll each stick in the egg until fully covered. After covered in egg, roll in bread crumbs. Repeat dipping in egg and then in bread crumbs once more.

If you have some time, stick the battered sticks in the freezer so they'll stay together a little better in the hot oil. If not, they will still turn out well but you'll need to eat them immediately.

If you have a deep fryer, turn it to 350 degrees and submerge a few sticks at a time for about 10 seconds and remove them quickly. Let them sit on a paper towel to drain a little of the oil before eating. If you don't have a deep fryer, heat oil on the stove top and test one stick by submerging it and then breaking it open to see if the heat is about right to both melt the cheese and to brown the batter.

ENJOY!

7.09.2009

Easy Asparagus


I don't know about the rest of you, but I never tried asparagus until I got married. Even then, I was hesitant. Not to mention, I didn't know the first thing about cooking it. My husband has cooked asparagus like this since I can remember ever trying it and it's always been my favorite! I've had asparagus at restaurants and they always seem to serve it a little on the crunchy side (comparable to celery's crunchiness), but I prefer it just a little bit chewier.


All you need is a handful of asparagus (with the blunt ends chopped off), about a quarter cup of soy sauce and about one clove of garlic, minced.

All you do is throw the asparagus right into the pan with the soy sauce and the garlic and pan fry it to your preferred texture. I usually let it fry for about 5-6 minutes. That way it's a little easier to bite into. The less you cook it, the more crunch it will be, but again, that's all based on your preference.

This is the quickest, easiest, yummiest way to eat asparagus in my opinion! Enjoy!

7.02.2009

Pie Crust

9-Inch Single Pie Crust

1 1/4c. all-purpose flour
1/2 tsp. salt
1/3 c.+ 1 Tbsp. butter-flavored shortening
Ice water (probably about 1/4 c.)


Making the Dough

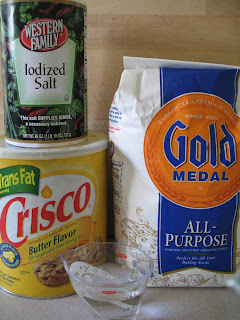
Combine flour and salt in a medium-sized bowl. Cut in shortening (room temperature) until you get pieces that are about pea-sized.

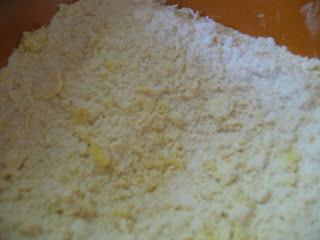
Start sprinkling the ice water by about a tablespoon at a time over the flour/shortening mixture. Very, very gently, turn the dough with your fingers so it gets exposed to the water. You're NOT mixing, just trying to moisten all of the flour/shortening mixture. Gradually, all of the flour mixture will be moistened.

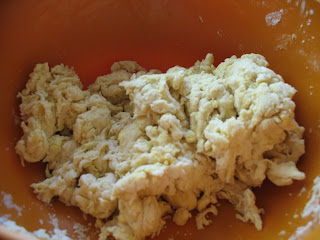
Gently pat the dough into a ball (it should come together easily but not be sticky). Wrap in plastic wrap and keep in the fridge until you're ready to use.

Rolling the Dough
When you're ready to roll out your pie crust, lightly flour your work surface and place the dough ball on the surface. One of the keys in making pie crust is to handle the dough as little as possible. Don't freak out TOO much; like I said, this recipe for crust is pretty forgiving, but at the same time, the less you touch it, the more tender and flaky it will be. Starting in the center, roll the dough out into a circle shape, about 1/8" thick. When you've reached your desired thickness, place the rolling pin in the middle and gently fold the crust over the rolling pin. Lift the dough onto your pie plate and unfold it (gently; notice a theme here?).

The Edge of Reason
Unless I'm planning on doing something fancy schmancy with my edges, I just run a sharp knife around the edges of the pie plate, cutting off the excess dough. Then I use my thumb and fingers to make kind of a big, wavy edge on the crust, but that's just how I do it; there are lots of pretty pie edges.


Pre-baked Crusts
Sometimes a recipe will call for a pre-baked crust. Some people place "weights" (either little balls specifically designed for this purpose, or even beans) in the pie to keep it from puffing and shrinking, but I've found that with this recipe, I don't need them. Just prick the bottom of the crust with a fork and bake at 450 for 10-12 minutes or until golden-brown.

If You Can't Take the Heat...
You'll want to keep an eye on your pie as it's baking because sometimes, the crust gets brown long before the pie is done. If you see this happening, take some tin foil and punch a hole a couple inches in diameter in the middle. Remove pie from oven and carefully, loosely place the shield over the pie (loose because you still want the steam to be able to escape). This will keep the edges from getting too brown while the middle finishes cooking.